5 Colourful DIY Christmas Decoration Ideas for 2022
Colourful DIY Christmas decor on a budget!
Colourful DIY Christmas decorations are a fab idea to try this year to save some coin. It’s safe to say we are all a bit more conscious of our spending this year… so why buy loads of trending decor that’s not only expensive but you might end up chucking it out next year anyway.
With a little extra work and imagination rather than spending big bucks on ready-made decor, you could create your own unique and personalised ornaments you can reuse year after year. It’s all about upcycling and finding thrifty ways of creating something special, it’s also a fun festive activity you can get the whole family on board with.
Here are my top 5 picks for colourful Christmas decorations that are not only super easy but won’t break the bank either!
___
Colourful Nutcrackers
Colourful DIY Christmas decorations need to be like these…simple, festive and adorable. These little guys are not only super easy to make but they’re super on theme too. You can really personalise them by choosing colours that best suit you and your colour scheme so don’t worry about painting these in the traditional red and black nutcracker soldier uniform. These look super fun on the mantle piece or scattered on your Christmas table.

How to –
You don’t really need a step-by-step tutorial that is how effortless these are to make. But it is good to start by sourcing the wooden nutcrackers first, Amazon has loads to choose from that are very much affordable.
Then all you have to do is paint one nutcracker at a time. Grab some paint, eggnog and get painting. Barbie in the Nutcracker movie anyone?? You can even get the kids involved for an extra pair of hands.
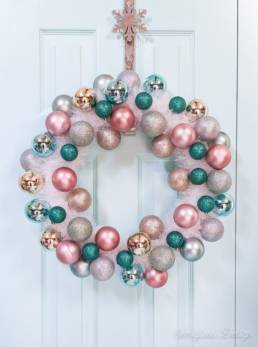
DIY Retro Christmas Wreath with Tinsel and Ornaments
Is it really Christmas without a wreath? I don’t think that’s possible, but assembling a live one when you don’t have holly growing in your back garden or pine leaves can wrack up the costs. Instead, you can make a colourful retro synthetic one using ornaments and baubles you might already have, after all, it’s all about UPCYCLING this year!
You will need the following:
- Foam wreath form
- Tinsel (you probably have some lying in the attic)
- Baubles in several sizes and colours. If you want to upcycle your old ones but don’t like the colours you can always spray-paint them!
- Hot glue gun
How to –
Apply a dab of hot glue to the wreath form then position the end of the tinsel onto the hot glue and hold it in place for a few seconds. Wrap the tinsel around the foam form. Adjust the tinsel every few inches to make sure it’s nice and tight to cover the form nicely. When you get to the end of the strand, apply another dab of hot glue and hold the end in position. Repeat the steps until your wreath form is concealed. When it’s finished, use more hot glue on any place that feels loose.
Then glue your ornaments to the wreath, spreading out the colours as you go. It’s easier to add glue to the ornament, not the wreath. Small spots can be filled in with smaller baubles. It’s helpful to glue ornaments to each other where they touch for extra stability. Hang and enjoy!
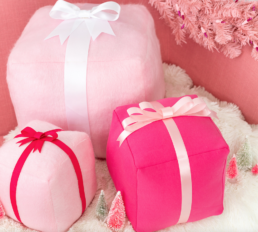
DIY Christmas Present Cushions
Why not make some more permanent home decor and make your own sofa scatter cushions for the Xmas season. This way you could also have more of a choice when it comes to colours as Christams themed cushions are usually in the standard green and red *snooze*
These fun and cheerful Xmas cushions from awwsam.com shouldn’t cause a headache if you already have some experience under your belt with the sewing machine. To make and will look pretty impressive on your sofa.
For these whimsical cushions you will need the following:
- 1 yard of fabric for each colour of present (fleece was used for these ones)
- Sewing pins
- Fabric scissors
- Sewing machine
- White thread or thread to match the color of your pillows
- Hand sewing needle
- Polyester fiberfill
- Paper patterns to make the present
- Ribbon for each present
- Fabric glue
How to –
1. Measure out a square to make a pattern. In 12″, 9″, and 6″ with 1/2″ seam allowance for three different size cushions. Cut out the patterns and set aside.
2. On your fabric, pin down the square pattern piece and cut out 6 pieces total. With right sides together, sew two of the square pieces along one side of the felt with a 1/2″ seam.
3. Continue to sew square pieces of fabric together to form a cube. Repeat these steps until you get to the last seam. Remember to leave an opening so you can turn you cushion right side out once you’re done sewing.
4. Turn your cushion right side out, and stuff it completely with fiberfill. Once the cushion is stuffed to your liking, hand sew the remaining open area shut.
5. To create the bow on your Holiday present, cut out a length of ribbon to fit around your present cushion. Wrap the present like you would a real one, gluing the ribbon to the fabric with fabric glue. Allow the glue to dry completely and you have yourself some new cushions!
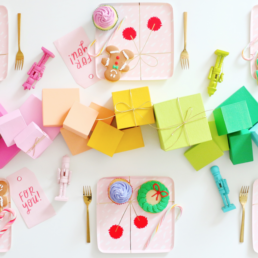
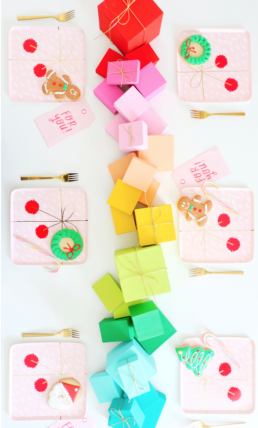
DIY Rainbow Gift Box Table Runner
Throw everything you might think of table runnerns because this 3D colourful gift box runner is anything but ordinary or drab. It’s so simple to make and you only need a few bits and pieces to bring it to life yet it looks so effective.
You don’t have to use the rainbow theme either, you can choose your own colour scheme to best suit your tablescapes.
To make this colour-crazy gift box table runner you will need the following:
- Acrylic Craft paint
- Paper mache mini gift boxes in various sizes
- Paint brushes
- Gold cording or colourful ribbon
The amazing thing about this little DIY project is how few supplies it requires and how straightforward it is. Just give your boxes a nice even coat of paint or two if it needs it and let them dry. Tie some pretty ribbons around a few boxes and line them all up down the centre of your table. Remember to arrange them in order of colours like the rainbow🌈
Easy peasy lemon squeezy!
Top tip – You want a variety of sizes for each colour, so don’t paint all the large boxes the same colour or your runner will be unbalanced.
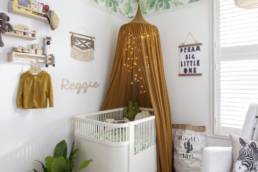
Ki'ds Colourful Advent Calendar
Shop-bought advent calendars are a little predictable and the higher-end ones which promise toys and gifts for every day leading up to Christmas can turn out to be crazy expensive. They don’t always get our kids right either and apart from the chocolate ones, there aren’t many that are gender-neutral, not every single little boy or girl is going to like the same things.
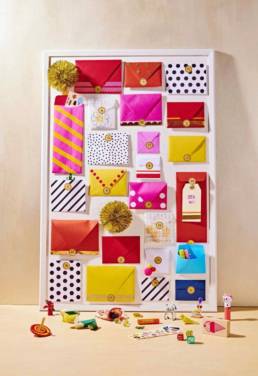
To make it a bit more exciting and turn it into a DIY decor project, you can simply make one yourself and fill it with everything you know your kids will love. This colourful envelope advent calendar is not only the easiest thing to make either, it looks the crack!
Gather envelopes of different colours, masking tape, stickers, pom poms, and stamps, and use pushpins to stick them onto a piece of corkboard, you could always blue-tac them to a wall or door too. Number each envelope and place a small treat or a slip of paper with a fun holiday-themed to-do inside. Don’t overdo it on the sweet treats however, save them for the last few days, since anything other than that might go down like a lead balloon with kids who will be expecting chocolate in every single one!
And there you have it! Colourful DIY Christmas decoration inspiration to make your home a little less predictable and a lot more fun without spending loads of money. If you want to know more about adding colour to your interiors check out my previous blog: How to use colour in Interior Design